 Pin It
 The first time I made these fresh Thai Basil Beef Rolls, my kitchen smelled like a street stall in Bangkok. I'd spent weeks craving that perfect balance of salty, sweet, and spicy that only Thai cuisine gets quite right, and these rolls delivered exactly what I needed. My roommate wandered in mid-rolling, eyeing the array of julienned vegetables and fragrant beef filling with understandable curiosity. By the time we sat down to eat, hands sticky from rice paper work, I knew this recipe was staying in my permanent rotation forever.
Last summer I brought a platter of these to a potluck and watched them disappear in under ten minutes. People kept asking what was in the sauce that made everything taste so vibrant and alive. I've since learned to double the recipe whenever friends are coming over, because inevitably someone wants to take leftovers home. There's something about the combination of warm, fragrant beef against cool, crisp vegetables that just makes people happy.
Ingredients
- 1 lb ground beef (85-90% lean): The fat content matters here. Too lean and the beef filling becomes dry, too fatty and it overwhelms the delicate fresh roll balance.
- 1 tbsp neutral oil: Peanut oil adds a subtle nutty sweetness, but canola works perfectly fine if that's what you have.
- 3 cloves garlic, minced: Fresh garlic is non-negotiable here. The aroma hitting the hot oil is half the magic of this dish.
- 1 small shallot, finely minced: Shallots have this gentle sweetness that regular onions just can't replicate. Worth the extra chopping effort.
- 2 Thai birds eye chilies: These pack serious heat. If you're spice-sensitive, start with one and taste as you go.
- 1 small red bell pepper: Adds sweetness and a gorgeous pop of color against the beef. Don't skip it.
- 3 green onions: Separate the white and green parts. Whites go in with the beef, greens get added at the end for fresh brightness.
- 1 cup fresh Thai basil leaves: This herb is the star. Regular basil works in a pinch, but Thai basil has those distinctive notes of anise and pepper that make this dish sing.
- 1 tbsp fresh lime juice: Added at the very end to wake everything up. Don't skip this final acid hit.
- 1 1/2 tbsp soy sauce: Use light soy sauce for seasoning. Dark soy sauce is optional and mainly for that rich, glossy color.
- 1 tbsp fish sauce: Don't be intimidated by the smell. It dissolves into pure savory depth once cooked.
- 1/2 tbsp oyster sauce: Creates this beautiful glossiness and adds subtle sweetness that rounds out the flavors.
- 2-3 tsp brown sugar or palm sugar: Thai food is all about balancing flavors. This sugar tames the heat and saltiness just right.
- 12-16 large rice paper wrappers: Look for the 22cm diameter ones. Smaller wrappers make rolling frustratingly fiddly.
- 1 1/2 cups cooked jasmine rice: Must be completely cooled before rolling. Warm rice makes wrappers tear and turns them gummy.
- 1 cup each julienned cucumber and carrots: The crunch factor is crucial. Cut them into thin, even matchsticks for the best texture.
- 1 cup fresh herbs (basil, cilantro, mint): Use any combination you like. The more herbs, the more vibrant and fresh these rolls taste.
Tired of Takeout? 🥡
Get 10 meals you can make faster than delivery arrives. Seriously.
One email. No spam. Unsubscribe anytime.
Instructions
- Prepare the sauce seasoning:
- Whisk together soy sauce, fish sauce, oyster sauce, dark soy sauce if using, and sugar until completely dissolved. Add just enough water to create a glossy, pourable consistency. Set this aside—it's the flavor backbone of your entire filling.
- Build your aromatic base:
- Heat neutral oil in a large skillet or wok over medium-high heat until shimmering. Add garlic and shallot, stirring constantly for 30-45 seconds until fragrant and just beginning to turn golden. Watch carefully like a hawk because garlic goes from perfect to burnt in seconds.
- Add heat and aromatics:
- Toss in minced chilies and the white parts of the green onions. Stir-fry for 20-30 seconds until the kitchen fills with that eye-wateringly wonderful chili aroma. This is when you know you're on the right track.
- Cook the beef:
- Add ground beef to the hot pan, using your spatula to break it into small crumbles. Cook for 4-6 minutes, stirring frequently, until the meat is mostly browned with some delicious crispy spots forming. Don't rush this step—proper browning equals maximum flavor.
- Add sweetness and color:
- Stir in the diced red bell pepper and cook for 2-3 more minutes until slightly softened but still retaining some crunch. You want texture contrast here, not mushy vegetables.
- Season the filling:
- Pour that reserved sauce seasoning over the beef and toss everything together thoroughly. Let it cook for 2-3 minutes, allowing the sauce to reduce slightly and cling to the meat. Taste now and adjust anything that feels off balance.
- Finish with herbs:
- Reduce heat to low, then add the chopped Thai basil and green parts of the green onions. Toss just until the basil wilts, which takes about 30-45 seconds. Turn off the heat completely.
- Add the final bright note:
- Stir in the fresh lime juice, then let the beef mixture cool completely to room temperature. Hot filling will tear your rice paper wrappers, and nobody wants that disappointment after all this prep work.
- Prep your rolling station:
- Cook rice or noodles if using, and cool them completely. Arrange all your vegetables and herbs in separate bowls so everything is within arm's reach when you start rolling. Organization makes the process so much more enjoyable.
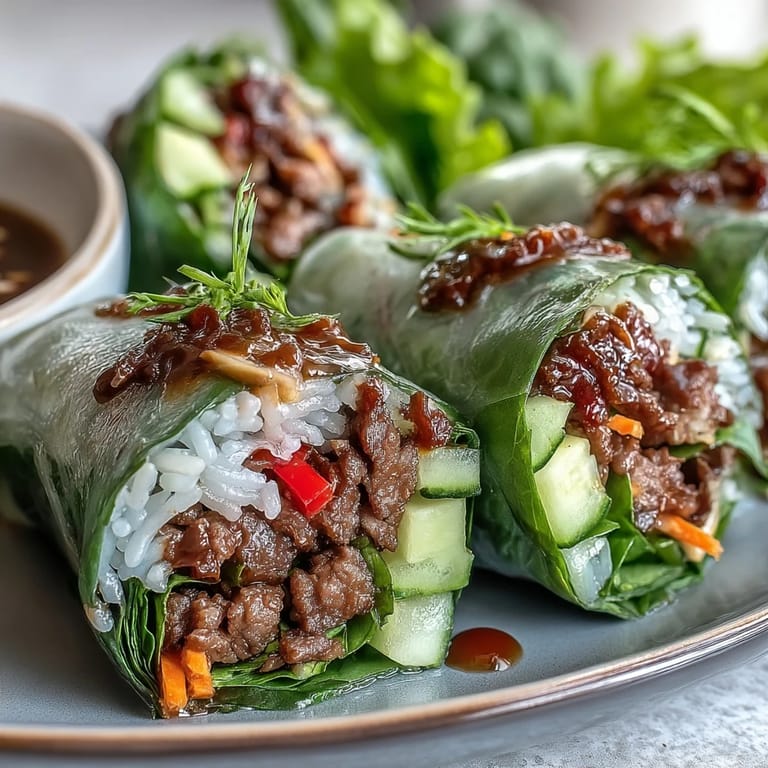
- Mix the dipping sauce:
- Combine fish sauce, lime juice, sugar, and warm water in a small bowl, stirring until sugar dissolves completely. Add garlic, chilies, shredded carrot, and herbs if using. Taste and adjust until you hit that perfect balance of salty, sour, sweet, and spicy.
- Set up your workspace:
- Fill a large shallow dish with warm—not hot—water. Have a clean board or plate ready, optionally lightly oiled to prevent sticking. A damp kitchen towel nearby is helpful for wiping your hands between rolls.
- Soften the rice paper:
- Working with one wrapper at a time, dip it in warm water for 3-5 seconds, rotating to moisten all over. Place it on your prepared surface and watch as it continues to soften and become pliable right before your eyes.
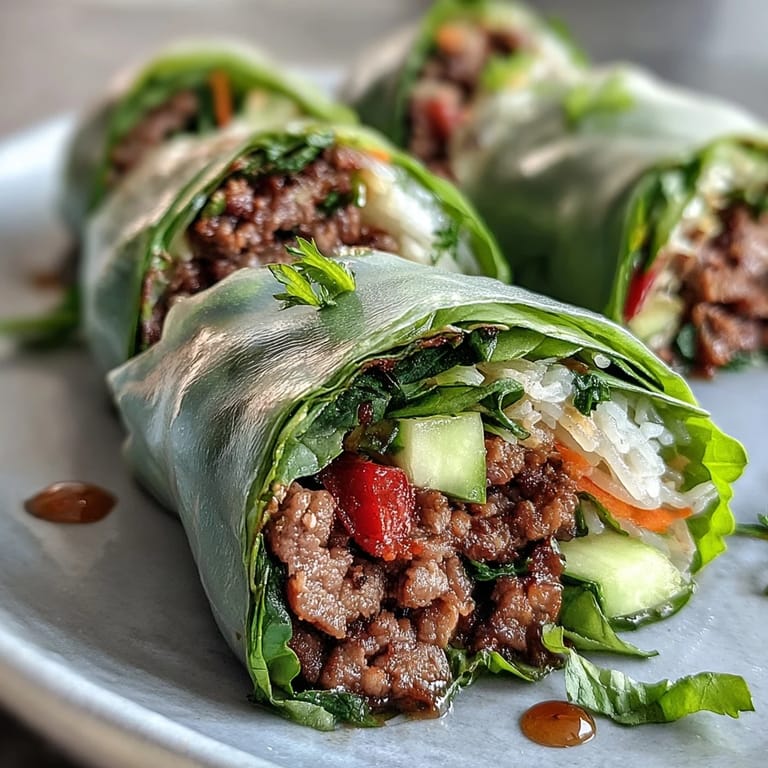
- Layer your fillings:
- Place about 2-3 tablespoons of cooled rice or noodles on the bottom third of your wrapper. Top with 2-3 tablespoons of that glorious beef mixture, followed by strips of cucumber and carrot, a small handful of lettuce, and a generous scattering of fresh herbs.
- Roll it up tight:
- Fold the bottom edge over the filling, then fold in both sides like you're wrapping a burrito. Roll tightly away from you until you have a neat, compact cylinder. The first few might feel awkward, but you'll develop a rhythm quickly.
- Repeat and serve:
- Place each finished roll seam-side down on your plate and continue until all fillings are used. Leave them whole or slice diagonally for a pretty presentation. Serve immediately with the dipping sauce on the side.
 Pin It
 My friend's eight-year-old, who normally survives on a strict diet of chicken nuggets, ate three of these rolls and asked when I was making them again. Something about the interactive nature of rolling your own food and the explosion of flavors in every bite makes these irresistible even to skeptical eaters.
The Art of Rice Paper Rolling
Rice paper has this reputation for being tricky, but honestly it's just about getting to know its personality. The wrapper should feel pliable and slightly tacky, not stiff or disintegratingly soft. If your first few rolls look a bit messy, don't worry—they'll still taste incredible, and you'll develop a feel for the right tension and folding technique. Some days the wrappers behave differently depending on humidity and temperature, so stay flexible and patient with yourself.
Flavor Balance Secrets
Thai cooking is built on the dance between salty, sour, sweet, and spicy. When you taste the beef filling, ask yourself what's missing. Too salty? Add more sugar. Too flat? A squeeze of lime. Not enough depth? Another splash of fish sauce. The dipping sauce should hit all those notes too, but slightly more intensely since it's meant to complement the rolls. Trust your palate and don't be afraid to make small adjustments.
Make-Ahead Mastery
These rolls are at their absolute best within a few hours of rolling, when the rice paper still has that perfect chew and the vegetables retain their crunch. If you need to prep ahead, keep the components separate and roll them just before serving. Wrapped rolls can be stored in the refrigerator for up to 2-3 hours, covered with a damp towel and plastic wrap to prevent drying out. Let them sit at room temperature for 10-15 minutes before serving—the cold makes rice paper stiff and less pleasant to eat.
- Always store rolls flat rather than stacked to prevent them from sticking together
- The beef filling actually tastes even better the next day, so consider making it ahead and keeping it refrigerated
- Never refrigerate rolled rolls longer than 3 hours or the rice paper becomes tough and rubbery
 Pin It
 These Thai Basil Beef Rolls have become my go-to for everything from casual weeknight dinners to impressing dinner guests. There's something deeply satisfying about food you eat with your hands, fresh and vibrant and bursting with life in every single bite.
Recipe Questions & Answers
- → How long do Thai basil beef rolls stay fresh?
Rolls are best enjoyed immediately within 2-3 hours of assembly. If storing, cover with a damp towel and plastic wrap, then refrigerate. Let them sit at room temperature for 10-15 minutes before serving—the rice paper becomes soft again and flavors return to their peak.
- → Can I make these beef rolls gluten-free?
Yes, simply use gluten-free soy sauce or tamari in place of regular soy sauce, and ensure your oyster sauce is certified gluten-free. Rice paper wrappers are naturally gluten-free, making the entire dish safe for those avoiding gluten.
- → What can I substitute for Thai basil?
Thai basil has a distinct anise-like flavor, but sweet Italian basil combined with fresh mint makes an excellent substitute. Use two parts basil to one part mint to approximate the aromatic profile. Regular basil alone works if that's what you have available.
- → How do I prevent rice paper from tearing?
Use warm—not hot—water and dip wrappers for just 3-5 seconds. The paper continues softening as you work. Lightly oiling your rolling surface helps prevent sticking. Handle gently but confidently; softened rice paper is more pliable than it appears.
- → Can I prepare the beef filling ahead of time?
Absolutely. Cook and cool the beef mixture completely, then store in an airtight container in the refrigerator for up to 3 days. Bring to room temperature before rolling—cold filling can cause condensation that makes the rice paper soggy.
- → What other proteins work well in these rolls?
Ground chicken, turkey, or pork substitute beautifully for beef. For a vegetarian version, use crumbled tofu or sautéed mushrooms with the same seasoning blend. The sauce seasoning works equally well across all protein options.